 Picture this: You’ve just invested in a colony of vibrant orange Sunkist shrimp, their colors reminiscent of a summer sunrise. But there’s one critical factor that could make or break your success – temperature.
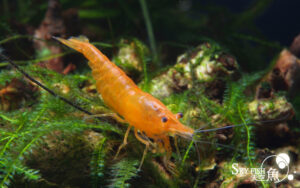
Neocaridina Sunkist shrimp are more than just living decorations. These eye-catching orange gems are hardy members of the Neocaridina family, capable of thriving and breeding readily in the right conditions. While they’re often marketed as beginner-friendly, understanding their temperature requirements is crucial for long-term success.
The difference between a surviving colony and a thriving one often comes down to temperature stability. Many newcomers to the hobby need to avoid allowing temperature fluctuations, leading to stressed shrimp, reduced breeding, and faded coloration.
Let’s be clear: Neocaridina Sunkist shrimp prefer temperatures between 65-75°F (18-24°C). But here’s what most guides won’t tell you – it’s not just about hitting these numbers. The real secret lies in maintaining consistency.
Think of temperature like your home’s thermostat. Just as you wouldn’t want your living room jumping between freezing and sweltering, your Sunkist shrimp need stable conditions to feel secure enough to breed and display their best colors.
Experienced breeders will tell you that Sunkist colonies kept in steady temperatures around 72°F (22°C) consistently outperform those kept at fluctuating temperatures, even within the acceptable range. This stability triggers natural breeding behaviors and promotes the development of rich, deep orange coloration that makes these shrimp so desirable.
The stakes are high – improper temperature management isn’t just about comfort. It directly impacts your colony’s:
- Breeding frequency
- Color intensity
- Molting success
- Growth rate
- Disease resistance
In the following sections, we’ll explore exactly how to achieve and maintain these ideal conditions, ensuring your investment in these stunning orange shrimp pays off with a thriving, self-sustaining colony.
Ideal Temperature Range for Neocaridina Sunkist
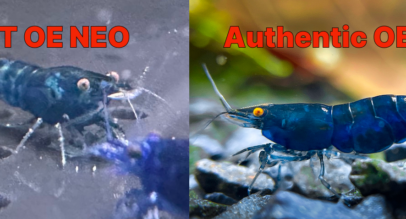
Temperature control plays a crucial role in maintaining the translucent blue coloration that makes Blue Jelly Neocaridina so captivating. While these shrimp share the hardy nature of other Neocaridina varieties, proper temperature management is essential for preserving their delicate appearance and promoting successful breeding.
Optimal Temperature Range: 20-26°C (68-79°F)
Within this ideal range, Blue Jelly Neocaridina display their finest characteristics:
- Translucent blue coloration
- Clear jelly-like appearance
- Peak activity levels
- Strong appetite
- Regular molting cycles
- Active breeding behavior
- Optimal growth development
For dedicated breeding colonies, experienced keepers maintain temperatures between 22-24°C (72-75°F). This specific range provides perfect conditions for reproduction while helping maintain their unique transparent blue coloration.
Tolerable Temperature Range: 15-30°C (59-86°F)
While Blue Jellies can survive at these temperature extremes, doing so carries risks:
At Lower Temperatures (15-19°C):
- Decreased activity
- Reduced breeding frequency
- Slower molting cycles
- Potential clouding of transparency
- Delayed juvenile development
- Higher risk of failed molts
At Higher Temperatures (27-30°C):
- Increased metabolism requiring extra feeding
- Shortened lifespan
- Greater disease vulnerability
- Reduced oxygen availability
- Loss of translucent quality
- Compromised breeding success
Temperature Stability Is Essential
Blue Jelly Neocaridina shows particular sensitivity to temperature fluctuations, which can affect both their transparent appearance and overall health. Maintaining steady temperatures is crucial – aim for changes no greater than 1-2 degrees within 24 hours.
Temperature Management Guidelines:
- Use reliable thermometers
- Install appropriate heater
- Choose temperature-stable location
- Avoid direct sunlight
- Monitor room temperature changes
While Blue Jelly Neocaridina demonstrates impressive adaptability, their delicate coloration demands careful temperature control. For maintaining show-quality specimens and successful breeding colonies, keeping temperatures within 20-26°C will help preserve their unique translucent appearance and ensure colony vitality.
The Art of Temperature Manipulation: A Professional’s Guide
Before you reach for that cold water jug, let’s discuss how successful breeders use temperature changes safely and effectively. This isn’t about quick fixes – it’s about understanding a delicate process that can either boost or devastate your colony.
The Proper Technique Follow this time-tested method for safe temperature adjustments:
Water Change Protocol:
- Match all parameters except temperature
- Use water 2-3°F cooler than the tank temperature
- Never exceed 5°F difference
- Drip acclimate the new water
- Perform changes during evening hours
Parameter Requirements:
- TDS within 10-20 of tank water
- Identical GH levels
- Matching KH values
- Similar pH (within 0.2)
Critical Warning Signs Stop the process if you observe:
- Shrimp swimming erratically
- Mass migration to the surface
- Unusual hiding behavior
- Immediate molting
Success Factors Temperature isn’t a magic bullet. Your success depends on:
- Stable tank parameters
- A quality diet with a variety
- Regular feeding schedule
- Proper male-to-female ratio
- Adequate hiding spaces
- Minimal tank maintenance
Remember The Golden Rule Less is more. A thriving colony needs stability above all else. While temperature manipulation can trigger breeding, it’s a tool of last resort, not a regular maintenance practice.
Professional Tip: Document your process. Track when you perform temperature changes and how your colony responds. This data becomes invaluable for future breeding projects and helps you fine-tune your approach.
The most successful breeders rarely need to manipulate temperatures because they’ve mastered the fundamentals of shrimp care. Focus first on creating optimal, stable conditions. Only consider temperature manipulation if your colony shows no breeding activity despite perfect parameters.
Your colony’s health always comes first. No breeding boost is worth compromising the long-term stability of your tank.
Understanding Temperature’s Impact: Beyond Survival
Let’s dive deep into how temperature shapes every aspect of your Sunkist colony’s success. What you’re about to learn could mean the difference between a struggling tank and a thriving display piece.
The Temperature-Success Connection
Metabolism and Growth Your shrimp’s entire life cycle depends on temperature:
- Warmer temps (70-72°F): Faster growth, more frequent molting
- Cooler temps (65-68°F): Slower growth, hardier offspring
- Optimal range: Balanced growth with highest survival rates
Breeding Performance Temperature directly influences reproduction:
- Higher temps accelerate breeding cycles but reduce offspring quality
- Lower temps slow breeding but produce stronger shrimplets
- Stable temps encourage consistent breeding patterns
Color Development Here’s what most sellers won’t tell you – temperature affects color intensity:
- Optimal temps promote rich, deep orange hues
- Stress from improper temps causes color fading
- Stable temperatures support even pattern development
Molting Success Temperature determines molting safety:
- Too warm: Risky rapid molts
- Too cold: Incomplete molts
- Just right: Clean molts with high survival rates
Lifespan Impact Temperature determines how long your shrimp will live:
- Optimal range: 1.5-2 year lifespan
- Too warm: 8-12 month lifespan
- Too cold: Extended but less active life
The Hidden Dangers
When Temperatures Soar (Above 75°F) Immediate risks:
- Rapid breathing from oxygen depletion
- Frantic swimming behavior
- Sudden deaths in weaker shrimp
Long-term damage:
- Bacterial infections become common
- Colors fade significantly
- Breeding stops entirely
- Failed molts increase
- Colony collapse becomes likely
When Temperatures Plunge (Below 64°F) Short-term effects:
- Lethargy and reduced feeding
- Breeding cessation
- Molting complications
Chronic issues:
- Bacterial infections from weakened immunity
- Stunted growth
- Reduced colony vitality
- Failed berried females
- Progressive decline in population
The Professional’s Secret Successful breeders focus on prevention rather than correction. They know that maintaining stable temperatures is far easier than recovering from temperature-related issues. Your monitoring strategy should include:
- Daily temperature checks
- Weekly parameter logging
- Monthly trend analysis
- Seasonal preparation
Remember: Temperature stability isn’t just about survival – it’s about giving your Sunkist colony the best chance to display its stunning orange coloration and maintain active breeding cycles. Every degree matters in the pursuit of colony excellence.
Professional Temperature Control: Your Blueprint for Success
Let’s cut through the marketing hype and discuss what works for maintaining stable temperatures in your Sunkist colony.
Essential Equipment Selection
Cooling Systems: The Truth About Chillers vs. Fans
Chillers: Pros:
- Precise temperature control
- Ideal for warmer climates
- Long-term reliability
- Consistent performance
Cons:
- Higher initial investment
- Increased energy costs
- Regular maintenance required
- Space requirements
Fans: Pros:
- Budget-friendly
- Easy installation
- Low maintenance
- Energy efficient
Cons:
- Limited cooling capacity
- Less precise control
- Increases evaporation
- Weather-dependent effectiveness
Professional’s Choice: A properly sized chiller is worth the investment for serious breeders. Calculate your needs using this formula: Tank Volume (gallons) × 50 = Minimum BTU/hr required
Heater Selection: The Critical Details
Essential Features:
- Titanium construction
- External temperature control
- Automatic shutoff protection
- Precise temperature adjustment
Sizing Guide:
- 5 watts per gallon for standard tanks
- Double for tanks in cold rooms
- Always install two smaller heaters instead of one large unit
Placement Strategy:
- Position near filter output
- Maintain 2-inch clearance from substrate
- Keep away from decorations
- Install horizontally when possible
Temperature Monitoring: Beyond Basic Thermometers
Required Equipment:
- Digital thermometer with 0.1°F accuracy
- Backup analog thermometer
- Temperature controller for redundancy
- High/low temperature alarm system
Strategic Placement:
- Primary sensor at colony level
- Secondary sensor near heater
- Backup thermometer opposite end
- Alarm probe mid-tank
Seasonal Management Mastery
Summer Survival Strategy:
Prevention:
- Install backup cooling systems
- Reduce lighting duration
- Increase surface agitation
- Monitor room temperature
- Use insulation panels
Emergency Protocol:
- Pre-chilled water bottles for sudden spikes
- Emergency water change supplies are ready
- Battery-powered air pumps
- Portable fans positioned strategically
Winter Protection Plan:
Essential Setup:
- Dual heater system
- UPS battery backup
- Insulation panels
- Temperature controller with alarm
Backup Systems:
- Battery-powered heaters
- Insulated water storage
- Emergency generator connection
- Heat-retaining tank covers
Professional Tips:
- Never rely on a single temperature control device
- Test all backup systems monthly
- Keep detailed temperature logs
- Plan for power outages
- Maintain emergency equipment separately
Remember: Your temperature control system is only as good as its weakest component. Professional breeders invest in redundancy because they understand that a single equipment failure can devastate years of selective breeding work.
Create an emergency response plan before you need it. When temperatures spike or crash, you won’t have time to research solutions – you’ll need to act immediately to protect your colony.
The most successful Sunkist colonies aren’t maintained by the most expensive equipment but by the most prepared keepers. Focus on building reliable systems with multiple failsafes rather than seeking perfect temperatures.